A serious rabbinic study space is not just a desk with books on it. If you are spending hours with sefarim, commentaries, notes, and digital references, your setup will either support your concentration or slowly work against it. A good rabbinic study desk setup example starts with one principle: the texts should rise to meet your eyes, not force your neck and shoulders downward for half the day.
At least, that's the way it should be if you really want to get your shteigen on.
That sounds simple, but the difference is substantial. Many learners build their study routine around a flat table, a stack of books, and whatever chair happens to be nearby. It works for twenty minutes. It works less well after two hours, when the upper back rounds, the cervical spine bends forward, and the desk becomes a place of strain instead of clarity. For sustained Torah study, especially when the material is dense and the sessions are long, ergonomics is not a luxury. It is part of the setup.
What a rabbinic study desk setup example should solve
The core challenge is familiar. Traditional study often involves large, heavy volumes, frequent page turning, handwritten notes, and periods of intense visual focus. In many cases, there is also back-and-forth between a primary text and supporting material, whether that means a second sefer, printed source sheets, or a tablet with searchable references.
A poor setup creates three immediate problems. First, it pulls the head into sustained flexion, which increases strain through the neck and upper spine. Second, it wastes desk space because large books spread outward instead of upward. Third, it reduces focus because you are constantly adjusting your body rather than staying with the material.
A strong setup fixes all three. It elevates the main text toward eye level, keeps supporting tools within reach, and makes the desk feel ordered rather than crowded. The result is not only more comfort, but better continuity of thought.
The ideal desk layout for long rabbinic study
Start with the central reading platform. This is the anchor of the entire workstation. For rabbinic study, the surface holding the main sefer needs more than a shallow angle and light-duty frame. Many religious and academic texts are heavy, and a flimsy stand tends to wobble, sag, or force compromises in positioning. A stable elevated platform matters because micro-movements are distracting, especially when you are reading line by line and thinking carefully.
The main text should sit directly in front of you, centered with your torso. The top third of the open page should land close to eye level, or slightly below it. That reduces the need to bend your neck downward. The angle should support reading without glare or page instability. For some learners, a steeper angle feels more natural for close textual analysis. Others prefer a more moderate incline for writing while reading. It depends on whether the session is text-heavy, note-heavy, or split between both.
Behind that simple placement is the real ergonomic gain. When the text is raised, the chest stays more open, the shoulders can settle, and the head remains better aligned over the spine. Over several hours, that is the difference between productive fatigue and mechanical discomfort.
Where notes, pens, and secondary texts belong
The mistake most people make is treating every item on the desk as equally important. They are not. The primary text gets the premium position. Everything else should support it without competing for the same visual space.
Keep handwritten notes slightly to your dominant side. If you are right-handed, place a notebook or legal pad to the right at a low enough position for easy writing. If you are left-handed, reverse it. This creates a natural rhythm - read forward, glance to the side, write, then return to center.
Secondary texts should stay nearby but not stacked in a way that forces twisting. If you regularly compare sources, place the second volume flat beside the central stand, ideally on the side opposite your writing hand. That gives you one clear reading zone and one supporting reference zone. The layout feels restrained, which is exactly what helps it function.
A practical rabbinic study desk setup example
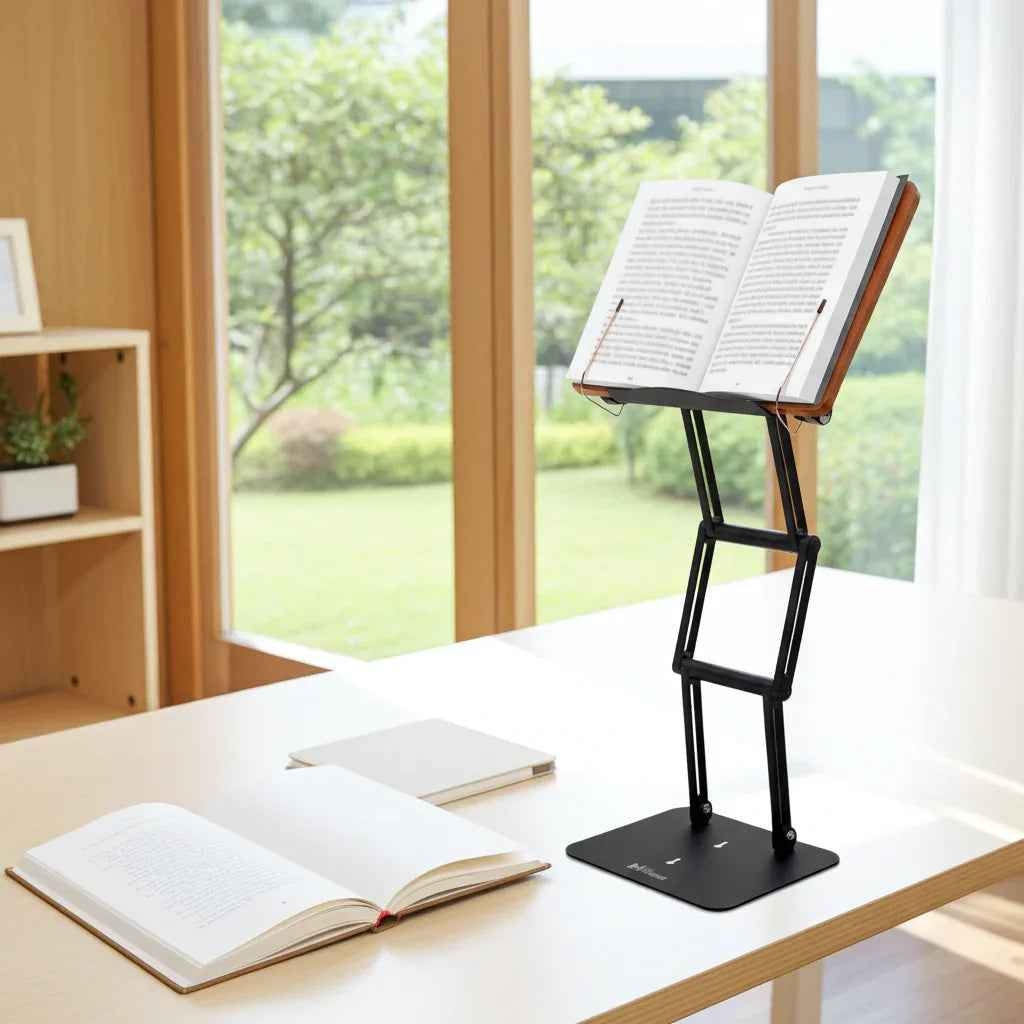
Picture a desk that is 48 to 60 inches wide. In the center sits an elevated reading stand with enough strength to hold a full-size sefer securely. The book is raised high enough that the reader looks mostly forward rather than down. The chair is adjusted so the feet rest flat on the floor and the elbows stay close to a ninety-degree bend.
To the right is a notebook with two pens and a small space reserved for active writing. To the left is a secondary source, either another text or a tablet used only for reference. A focused desk lamp sits high and off to one side, bright enough to illuminate the page without casting hand shadows. The laptop, if needed, is closed and moved away unless it is actively part of the session.
What makes this setup effective is not complexity. It is restraint and elevation. The desk is arranged around the act of study, not around general desk storage. Every item has a role. Every position protects attention.
Seating, height, and posture details that matter
Even an excellent stand cannot compensate for a bad chair height. If your seat is too low, your shoulders rise and the book still feels too far down. If the seat is too high, you lose grounded foot support and create pressure through the hips. The simplest target is stable feet, relaxed shoulders, and a neutral gaze toward the text.
Back support should help you sit upright without forcing a rigid posture. You do not need to sit perfectly still. In fact, slight movement is healthy. But the setup should make the default posture a good one. That is why a raised study platform is so effective. It improves the position you return to over and over.
Lighting also deserves more respect than it usually gets. Many learners compensate for poor lighting by leaning closer. Then the neck bends, the face moves toward the page, and the benefit of the setup is reduced. A clear, bright reading field allows a more natural viewing distance.
Why a modern shtender outperforms improvised solutions
Stacks of books, cheap wire stands, and low-angle cookbook holders all have the same weakness: they are makeshift answers to a serious workload. They may hold a light paperback for casual reading, but rabbinic study often demands more. Heavy volumes need real support. Extended sessions need stable height. Repeated use needs durable joints and materials that do not loosen quickly.
This is where a modern shtender earns its place. It preserves the traditional logic of raised study while solving modern desk problems - posture, adjustability, shared use with digital tools, and long-term stability. A premium stand can serve as a text platform, laptop riser, and tablet holder without feeling like a compromise in any of those roles.
For users who move between sacred texts, academic reading, and professional work, that flexibility matters. One well-engineered platform can reduce clutter and improve body mechanics across the entire day. That is a better investment than cycling through multiple low-cost accessories that never quite work.
Common setup mistakes
The first mistake is keeping the book too low because it feels familiar. Familiar is not always functional. If you study for long periods, the setup should reduce cumulative strain, not preserve it.
The second mistake is overloading the desk surface. Too many active items create visual noise and physical inefficiency. Serious study benefits from selectivity.
The third mistake is buying for portability when the real need is stability. If your primary use involves substantial texts and daily sessions, the stand should be chosen for structural confidence first.
A product like The Stander 1.1 fits this use case because it is built for actual load, actual elevation, and repeated use, not occasional convenience. That distinction becomes obvious once the desk is doing real work.
The setup should match the way you learn
Not every learner studies the same way. Some spend hours in a single volume with minimal writing. Others compare multiple sources, annotate heavily, and switch between print and screen. The right desk setup reflects those habits rather than forcing a generic arrangement.
If your work is primarily text immersion, prioritize the central elevated book position and clean side space for occasional notes. If your study is source-comparative, build the desk around one elevated primary text and one adjacent reference zone. If you blend rabbinic study with teaching or writing, make sure the setup can shift between reading mode and production mode without a complete reset.
That is the real standard. A rabbinic study desk should support concentration, posture, and continuity at the same time. When it does, the desk stops being a physical obstacle and becomes what it should have been all along - a serious platform for serious learning.
If you are studying for hours each week, your body is already paying for your setup. Better to make sure it is paying into focus rather than strain.